Cupping therapy is one of the most ancient therapies that managed to survive until present day. It was developed more than 3000 years ago in different parts of the globe, starting in Egypt and China, two very powerful cultures of that time.
Fire Cupping
Later in Ancient Greece, Hippocrates also described the use of cupping in his practice.
After that cupping therapy spread through the European and Asian continents.
It was adopted by many civilizations as one of the main medical tools, along with bleeding techniques in Arabian cultures (nowadays called Hijama or wet cupping), with acupuncture and manual techniques in China and its Asian neighbors, and later also along with western medicine in The Soviet Union and its surrounding East European countries.
In the past, cupping was used to cure all kinds of diseases, including fever, digestive conditions, gynecological issues and skin problems (such as acne, boils and toxic lesions).
Nowadays, cupping therapy is mostly useful with musculoskeletal diseases, especially those of the trunk and its proximity – namely back, hips, shoulders and neck.
Recently it became very popular treatment in sports medicine, due to its high efficiency in muscle recovery.
We all saw the American swimmers and athletes covered with these very special bluish circles on their shoulders and back during the last Olympic Games in Brazil.
Additionally, it effectively treats headaches & stress due to the deep muscle relaxation effect that it provides.
And eventually, cupping is still popular and effective with treatment of Flu & respiratory diseases.
How does it work?
Now let’s take a look into the mechanism behind cupping therapy. Let’s try to understand how cups actually influence the body. And what does it do to our tissues to get the healing effect?
Well, to understand that, let’s first of all talk about the ancient traditional Chinese medical understanding of the cupping mechanism.
According to Chinese medical theory, human body is a network of channels, called meridians. In these meridians flow qi and blood, that supply energy and nourishment to every tiny part of the body. Once the meridian is blocked or stagnated (for any reason), pain appears in there. And toxins start to accumulate in the blocked area.
Cupping forcefully removes this blockage, reestablishes the good flow of energy and nourishment and allows it to reach its destination. In addition, it helps to clear the already accumulated toxins in the treated area.
Now let’s talk about the western interpretation of it. Oxygen and nutrients reach all body cells with the blood flow. On the other hand, lactic acid and carbon dioxide produced by our cells (the so called cell waste), are cleared also by a good and healthy blood flow.
When tissue is overloaded or injured – adhesions occur there. This leads to limited motion, pain and reduction of blood flow. Limited blood flow causes insufficient supply of oxygen and nutrients and cells waist accumulation.
Cupping stretches out the fascia, removes adhesions and relieves motion of the tissues. Likewise, it helps to pull out the accumulated cells waist from the deeper layers.
At that time, cupping also significantly improves circulation and increases fresh blood flow to the treated area, where the cells start to get a fresh supply of oxygen and nutrients. Then cell metabolism is reestablished, pain is reduced and the tissue gradually heals.
In addition, bruises, caused by cupping, trigger certain immune response that helps to deal with flu and respiratory diseases.
Types of cups
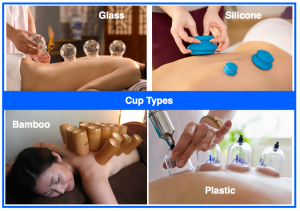
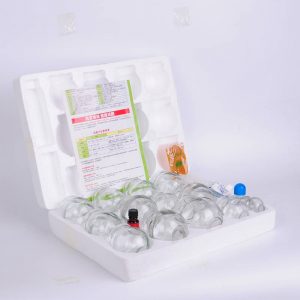
In ancient times cups were made of animal horns, pottery, bronze and bamboo. Nowadays glass cups, plastic suction or even silicone cups are mostly in use. You can still find bamboo cups on the market, but they are much less in use.
Glass cups were mostly in use during the 19th and 20th centuries and are still relevant. They are usually made of thick glass with round shaped lips, but technically you can even use your home coffee or tea cups. To apply glass cups you need forceps, cotton balls, 99% alcohol and lighter. The application is easy, but still requires some practice to do it effectively and caution to avoid burns.
Plastic vacuum cups came later and are much easier to use. Their main advantages are safety (there is no danger of burning the patient) and the option to control the vacuum level. In addition they are less fragile than glass cups. There are mainly 2 kinds of plastic vacuum cups – Korean type and Chinese type. Korean cups are usually made of harder polycarbonate and more convenient to use, but they are also more expensive than Chinese cupping sets.
Silicon cups are the latest material for cupping and very safe. This kind of cup also doesn’t require any accessories for application (no fire, no vacuum gun, nothing). And they are not fragile at all (plastic cups are better than glass, but still can crack if they fall). However, , they are not my favorite for 2 reasons:
1)Many of silicone cups on the market are not transparent
(later I’ll show you why it’s so important)
2)The vacuum control is more difficult and limited (you cannot apply it really strongly).
During the course I’ll show and explain more in detail the use of glass, plastic and silicon cups. But later in the protocols’ chapter, I will demonstrate mostly with Korean plastic suction cups and partly with silicone transparent cups, since they are best to use and easiest to apply. Even though some therapists believe there is an advantage to glass cups applied with fire, I didn’t find any clinical evidence for that.
Precautions
Make sure that your patient’s blood sugar level isn’t too low. It means that, like in any other massage or acupuncture therapy, the patient should not come for treatment on an empty stomach.
Cupping is prohibited for patients who take strong anti- thrombotic agents, since it can cause bleeding.
Be careful not to cup scars, blisters, beauty spots, lesions, irritated skin and so on. As a general rule, anything suspicious on the skin – better avoid cupping it.
Of course, do not use cups on any known cancerous area.
With pregnant women, avoid cupping the lower back, abdomen and upper trapezius area (because in Chinese medicine, stimulating this area can induce the birth process).
Avoid cupping acutely inflamed areas – as this can aggravate the inflammation
Cupping frontal and lateral neck (namely SCM and scalene muscles) is also prohibited because of large blood vessels proximity. Cupping massage can be used instead.
Inform the patient about the temporary discoloration of the cupped area. It is especially important in exposed areas, such as the neck and shoulders.
The procedure can be painful for the first minute, but then the patient should “get used to the feeling” and feel more comfortable. If the patient still complains that the pain from the cup is too intense, you should remove the cup and reapply it with less suction. That is actually one of the big advantages of plastic cups with suction gun over regular glass cups – you can actually control the level of suction.
The patients should be aware of possible aggravation during the first 2 days after the procedure. However, in most cases they feel immediate relief.
Make sure not to leave the cups on for too long, as this can cause unwanted blisters. They aren’t dangerous, but bothersome and usually can last for several weeks to months. However, if you are a trained acupuncturist you can prick the blister with a syringe needle and so hasten the healing process (I’ll show this technique later, in the last chapter).
Cupping Applications
Body preparation
First of all, the patient should be aware of the procedure he is about to undergo. This is especially important because of the esthetic issues. You must explain to the patient that the dark circles created due to the cupping can remain visible for 5 to 15 days after the treatment. Don’t get me wrong – it is totally worth it, but the patient should understand this. Some patient’s ask me to avoid cupping on certain days, because they have a special event during the same week and they don’t want others to see
the cupping signs, and that is a reasonable request. In this case I usually reschedule cupping for the next session.
After you agree to it, make sure the patient is in a comfortable position for the treatment. The position depends on the treated area. For example, for bi-lateral lower back pain, a prone position is optimal. For shoulder pain, a sitting position or lateral recumbent position is better, because you can then cover the entire shoulder area.
Before you cup, it is recommended to lubricate the skin with a soothing cream, especially if the patient is hairy, as the cream will allow you to create better suction. I prefer aloe cream, because it helps to prevent skin itching (which can happen after cupping). You can also use massage oil or balm instead of cream, but then the cleaning of the cups after treatment will be more difficult. Likewise, it is more difficult to hold the cup firmly with oily hands.
Glass cups
Glass cups were the most widely used cups in the last 2 centuries.
For some people it looks very tricky and difficult to apply with all these “special fire effects”, but actually it’s quite simple.
Glass cups
Prepare a cotton ball, forceps, alcohol and lighter. Take the cotton ball with the forceps and soak it in alcohol. Make sure to squeeze it a bit, to avoid burning alcohol drops from harming you or your patient.
The idea of this application is to burn the oxygen from inside the cup – thereby creating a vacuum – and to stick the cup quickly onto the body, before fresh oxygen infiltrates the cup.
So it is very important to be close to the patient and hold the cup close to the area you want to apply it on.
Light the cotton ball; put the forceps with the lighted cotton ball inside the cup for few seconds, take it out and quickly place the cup on the patient’s body.
Make sure you don’t hold the lighted forceps outside the cup or close to its base, causing the cup’s rim to heat and eventually burn the patient.
Be careful with large size cups, as they are usually heavy and can fall during the treatment, especially if you treat your patient in sitting position.
Leave the cups on for 5-15 minutes. During this time, keep your eyes on the cups to avoid blisters appear.
When finished, press the skin near the cup to let air come inside the cup and it will be released. After the treatment, clean the cups with flannel soaked in alcohol.
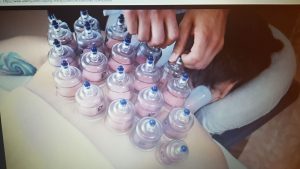
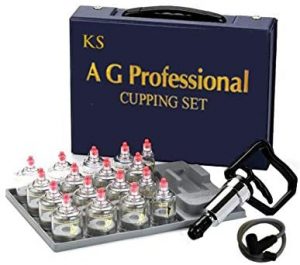
This is the first serious cupping upgrade that came into being several decades ago. These Chinese plastic vacuum cups make your work much easier and safer than with glass cups.
They come with a special plastic suction gun that sucks the air from inside the cup and allows the cup to attach to the skin easily. In addition, a tube is usually provided in the set, allowing you work more conveniently or to cup yourself if needed.
Chinese cupping set
Another advantage of plastic vacuum cups is that you can actually control the vacuum level. It is especially important for sensitive or delicate patients, because you can apply the suction gradually.
Take the cup from the box with 2 fingers, attach it to the tip of the cable or the pistol. Then place the cup on the area to be treated, apply 1-2 suctions and leave it. Then take another one, and one more. Cover all the treated area with cups and wait. Let the patient get used to the feeling for few seconds. Afterwards, you can add more suctions, in order to obtain the necessary pulling level.
Sometimes 1-2 suctions will be enough, but usually you need more in order achieve the desired effect. Some patients will even ask you pull it to the maximum level (which can be 6-7 suctions), but on average 4 suctions are enough.
As for time management, it is the same as with glass cups. Leave them on the patient’s body for 5-15 minutes and monitor the cups to avoid blisters.
Releasing the cups is also very easy. Just pull on the little nipple on top of the cup and it will be released.
Don’t forget to clean the cups after the treatment with soaked in alcohol flannel.
Chinese plastic cups are very cheap, so it can be a good start for you. There are mainly sets 6, 12 or 24 cups on the market. For professional use, I recommend buying the set of 24 cups, as the price difference is insignificant and working with large set is much more convenient.
These are my favorite cups! And I have my reasons for that:
First – Korean plastic vacuum cups have all the advantages of the Chinese cups.
Korean plastic cups
Second – they are made of a very good quality and solid material, so even if they fall on a ceramic floor – it is hard to crack them.
Third reason is that they have a more convenient suction gun with a better tube, which makes your work easier.
And finally – they are usually packed with rims down and nipple up. That can increase your work speed. Watch this: (example of fast cupping of the back in lateral).
Now I’ll demonstrate it in detail: first of all, attach the cable to the pistol (I recommend securing the attachment with adhesive tape). Then, hold the suction gun with one hand and attach the tip of the tube to the cup with your second hand. Hold the cup with the same hand, put it wherever needed and apply suction immediately with the gun. Then, leave the cup and repeat, and again. and again… and so on! After that you increase the pulling level if needed.
The rest of the procedure is pretty much the same as with the Chinese cups.
Also here I recommend buying large set with many cups for your convenience. Personally I prefer the 30 cups set of Hansol Medical brand.
This is one of the most recent cupping therapy developments.
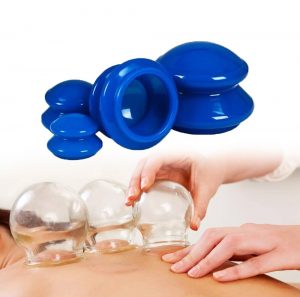
Silicon cups are not fragile at all! You can throw them, smash them and… nothing will happen.
Silicon cups
You can easily apply them without any additional device, just squeeze the cup and put it on the area to be treated. Leave them on for 5-15 minutes as usual.
Silicon small cups are used widely in Chinese medicine for cosmetic facial treatments because its material is softer and more suitable for facial skin. For this reason, I like to use silicone cups for sensitive areas, such as upper trapezius, base of the scull and neck. In addition, they are my favorite choice for cupping massage.
There are 2 main disadvantages to silicon cups:
First, many silicone cupping sets on the market are not transparent and you cannot clearly see what is going on under them, which means you can miss the appearance of blisters.
Secondly, the suction level is limited and for many patients it is simply not enough vacuum pressure for effective application. They are more suitable for gentle and sensitive patients.
And finally, they are not cheap at all. But, as I said before, they are very safe and easy to use.
There are two mainly recommended kinds of silicone cups on the market – glass cup shaped and plastic cup shaped. The first one is more convenient and effective to use, but you can try them both. I recommend the Green Island brand silicone cups (or something similar to it), since they are also transparent. You can easily find them on
Cupping massage is also called vacuum massage or sliding cups. This technique can be applied with all the discussed types of cups –glass, plastic or Silicone. Silicone cups are definitely the best choice for this procedure, because they have softer rims, thus causing less harm to patient’s skin. Likewise, as I mentioned before, they are the easiest to use for therapist.
Cupping massage
The technique emphasizes the moving of stagnated blood and energy, and can be used instead of cupping, for patients who don’t like cups, or cupping marks on the body. It can still leave some marks, but they disappear faster than regular cupping circles. However, static cups application is more effective, especially for deeper tissues. That’s why I prefer to use cupping
massage only in addition to standard cupping procedure and not instead of it. Then the therapeutic effect is much better.
In case of cupping massage, it is especially important to lubricate the patient’s skin with rich layer of the cream, because you need to make the cup slide smoothly.
Cupping massage is usually applied with large cups on back muscles, and with smaller cups on the neck and shoulder muscles.
Silicone cup sliding feels very comfortable for the patient because it has a softer surface. The suction level is a bit more limited than with plastic vacuum cups, but usually it enough for this application.
In case of silicone cups you can easily work with both of your hands simultaneously. This will significantly shorten your worktime.
Treatment Protocols
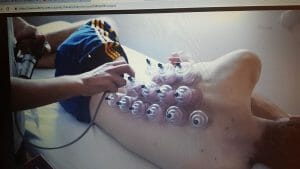
Lower back
Lower back pain is the most commonly seen complaint in clinical practice. I see patients with lumbago almost every day. It can be acute and sharp pain, or chronic and bothersome lower back stiffness.
Lower back
The good news is that most of these patients can feel a great relief with cupping.
Cupping the lower back is mostly convenient to apply in a prone position. However, if the patient cannot lie with face down, you can also do it in a lateral recumbent. But you will have to do the job twice, unless the pain is unilateral.
Now let’s have a look on the area we want to cup. Our goal is to cover all the reachable lower back pain related muscles – which are quadratus lumbarum, lumbar multifidus, longissimus, Iliocostalis and upper portion of gluteus medius.
Before cupping, lubricate the patient’s skin with cream and wipe your hands.
Then start sliding the silicone cup along the mentioned muscles – first vertically (you can also apply it directly on the spine), then also horizontally. After patient’s skin changes color to red, proceed to static cups application
Locate the first cup on the area just above the sacrum close to the spine, and apply the suction. Then proceed with the next cup in the same line just above the first one. Leave a tiny gap between them, so that when the cup is pulled out, this gap disappears. Then continue in the same way for the 3rd and 4th cups.
Repeat the same procedure on the other side.
Then start cupping the outer lines, just between the previous cups, in the same manner.
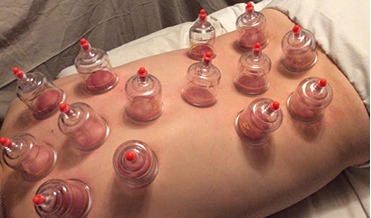
As you see, the cups cover a pretty large area. I advise cupping with many cups because then you have less chance of missing the source of the pain. So do not economize on cups.
After you finish positioning all the cups, you can increase the suction to the necessary pulling level. Then wait for 5-15 minutes. Monitor the cups to avoid blisters appearance, especially if you treat an elderly patient.
Then remove the cups and have a look at the cupped area. The picture you see after cupping is actually very important. It serves you as a diagnostic tool. Look, some of the circles are darker than others. The dark circles mean that the area is more stagnated and has more toxins accumulation in it.
So in the next session, I will cover (with cups) the untreated areas in between, and emphasize more around the dark circles.
With acute conditions it usually takes 3-5 sessions to resolve the pain, for chronic back pain at least 10 treatments are necessary. Treating twice a week with 3-4 days interval is optimal.
Hip and sciatica
Hip pain and sciatica is also a common pathology in the population. It can be a result of the lower back spinal compression or gluteal muscles spasm. In case of spinal nerves damage, cupping may provide only transient relief. But if the sciatic pain radiates from the gluteal muscles, cupping will easily heal the pain completely.
Hip and sciatica
The most effective position for this protocol is a lateral recumbent with the patient’s upper leg folded over the lower stretched leg. In this position the gluteal muscles are more exposed and are closer to the surface.
Gluteus minimus and piriformis are overlying the sciatic nerve, therefore, stiffness and trigger points formation in these muscles
can easily induce sciatica. Other muscles spasm in this region mostly causes local pain.
Cupping massage on the gluteal area is inconvenient and according to my experience is less effective.
For the upper part of the hip I usually start cupping just below SIJ. Then I continue laterally – cup by cup, until I cover completely the area under the PSIS arc. After that I cup one more line below, in between the previous cups. Here I stop and wait for 5-15 minutes.
Treating the hip can be problematic because the patient must expose his (or her) buttock (which can be uncomfortable, especially if you treat the opposite gender). Therefore I ask the patient in advance to come with short pants for the treatment. Then I first cup the upper part, exposing only the upper gluteal area. And after I finish this part, I remove the cups, cover the upper gluteus back, and fold the shorts up from the bottom, until I see the bruises of the area I have just cupped.
From here I continue the procedure on the lower part of the gluteus in the same manner. The last cups will be placed at the gluteal fold line.
In the next session, I’d like to address more specifically the darker areas and the untreated spots.
Usually in acute cases 2-4 treatments are enough. In chronic conditions at least 8-10 treatments may be needed. Treating twice a week is optimal.
Lateral back
In most cases lateral thoracic pain occurs due to muscle spasm. That’s why cupping is so effective for it.
Thoracic pain is usually triggered by serratus, iliocostalis and latissimus dorsi muscles.
In this protocol I start with cupping massage in prone position. And after I finish, I turn the patient to lateral recumbent for static cups application.
Lateral back
Place the first cup on the most painful spot beside the spine. Then spread the cups up and down the back, 2-3 cups to each direction. The proceed cupping the outer lines. The amount of cups depends on patient’s body size and pain radius.
After the time is up, remove the cups and lubricate the skin again if necessary.
In the next session I will emphasize cupping around the dark bruises and uncovered spots.
Acute cases can be resolved even after one treatment, while in chronic conditions it may take 6 treatments to heal the back. Treatment given twice a week is most effective.
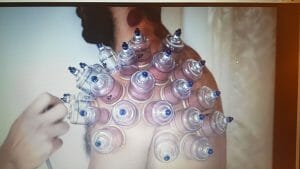
Upper back
The trigger to upper back pain is usually based on daily activity – like housework, caring the child, prolong driving and so on. Many professional sportsmen have increased overload of the upper back muscles because of their bodywork.
Upper back
Treating upper back pain has probably the highest success with cupping.
Here we can let the patient be in either – a sitting position or lying in a prone position, depends on his or your preference.
Upper back pain mostly involves the trapezius muscle, rhomboids, levator scapula, supraspinatus, infraspinatus, subscapularis, latissimus dorsi and thoracic multifidus. Many of them are overlying each other.
Lubricate the skin, and start sliding the cup along the mentioned muscles in a vertical motion. Go down till the lower part of the scapula. Then go laterally to cover the scapula itself. After that, slide horizontally, until you see the skin color slightly changes to red. Then proceed to static cups application.
Start with the first cup on the intersection point between the shoulder, spine, neck and upper back, and place 4 cups in a row, till the lower part of the scapula.
Then place a parallel line on the other side.
Thereafter proceed with the outer lines on both sides.
Finish with a silicone cup above the upper trapezius. Upper trapezius is a very sensitive area, so I recommend applying here silicone cup.
After finished placing the cups, increase the suction gradually to the necessary pulling level and wait for 5-15 minutes.
Then remove the cups and apply additional soothing cream by the end of the session.
In the next treatment cover the untreated gaps between the cups and emphasize cupping the more colored areas.
If the pain is on one side only, no need to cup the other side. Just focus on the painful side.
In acute cases 2-4 treatments can be enough. For chronic conditions at least 6 treatments are needed, with 3-4 days intervals between them.
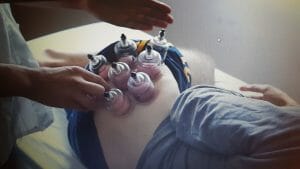
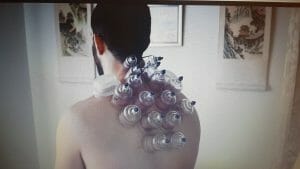
Neck pain
Cupping the neck is a bit problematic because the area is exposed and the patient will be bruised for a while, so make sure your patient is aware of this and gives you his permission for cupping.
Neck pain
Another problem with neck cupping is the proximity of the jugular veins and carotid arteries. For this reason it is not advised to cup the frontal and lateral neck muscles, which means that we are limited to work only on posterior and posterolateral neck area.
For neck cupping place the patient in a sitting position.
Neck pain usually involves the lavetor scapula, splenius cervicis, multifidus and trapezius muscles.
Here I usually put on more soothing cream, especially on the occiput, because of the hair, otherwise the cups won’t hold. Smear the cream in an upward motion, so the hair will be more organized and less troublesome.
For neck cupping massage I usually take small or medium size silicone cup, and slide it from the base of the scull down till the spine of scapula level. Do it on both sides. Then continue sliding laterally on the trapezius muscle (do it on both sides too, if the pain is bi-lateral). And finally slide above the cervical spine. When the skin becomes slightly red, continue working with static cups.
For the neck area we need smaller cups. Locate the first cup just below the occiput, next to the spine on both sides. Then apply 2 small cups below them. Then proceed down with larger cups.
Continue cupping until you reach the medial upper part of the scapula. Then add few cups laterally and finish with silicone cup on the upper trapezius.
Leave them on as usual for 5-15 min. After time is up, release the cups, and reapply them on posterolateral line of the neck in the same manner.
In the next treatment cover the untreated spots between the cups and emphasize more around the dark bruises.
2-4 treatments in acute stage are usually enough. For chronic conditions it most likely will take at least 8 sessions. 5-6 days interval between treatments will provide the best healing.
Frozen Shoulder
Shoulder reacts very fast and well to cupping. However, tissues of this joint are usually more sensitive than those of the back, especially if the patient has frozen shoulder, so be more careful with it.
Frozen Shoulder
Sitting or lateral recumbent – both positions are good for this protocol, as it is important for you to be able to access both the anterior and the posterior shoulder muscles.
Shoulder is a complex joint and there are many muscles supporting it. Deltoid is the central and the most important one to cover. Then I need to address the biceps tendon and the pectoral muscles on the front; infraspinatus, subscapularis and teres muscles on the back, and finally the trapezius and the supraspinatus on top of the shoulder.
Lubricate the skin, and start sliding on all the mentioned muscles. Slide gently here, without much vacuum pressure.
Then place the first cup on the most painful area on the deltoid and slightly apply suction. Then continue spreading cups in all directions one by one.
The shoulder is a round shaped joint, so you need to be more flexible with cups size in certain areas.
After all cups placed, increase suction according to patient’s tolerance. If you overdo the suction and the patient feels it too strongly, release the cup and reapply it gradually, otherwise you can cause pain aggravation.
After the time is up, remove the cups and do your evaluation for the next treatment according to cupping bruises.
The earlier you start the treatments – the better and faster outcome you can expect. In the beginning of the freezing stage, 2- 4 sessions can be enough. For chronic frozen stage 10-15 sessions can be required.
Usually 4-5 days interval time between treatments is optimal.
Now frozen shoulder protocol is completed. See you at the next video.
Respiory disorders
Cupping therapy can be useful for speeding up healing time from respiratory illnesses, such as flu accompanied by cough, shortness of breath and asthma.
Treating lung diseases is actually the most famous ancient use of cupping. Before the advent of antibiotics, it was one of the most effective and popular ways to treat tuberculosis.
In this treatment I cup both – the upper back and the chest simultaneously, that’s why I ask the patient to stay in a sitting position.
Here I recommend lubricating patient’s skin with tiger balm, as it provides additional therapeutic effect on respiratory tract.
Instead of cupping massage I use here flash cupping. Using this technique I place the silicone cup and pluck it immediately. Do it until the skin becomes slightly red. Flash cupping helps to remove stacked phlegm from lungs and trachea.
Then cup the upper back, starting beside the last cervical vertebra. Place 3-4 cups in a row – depends on patient’s body size. Apply it on both sides of the back. Then proceed to the second line lateral to it, again on both sides. After that, cup the lateral border of the scapula.
Then continue cupping the frontal area, on patient’s chest. Put 2 cups on each side, between the shoulder and the sternum on upper portion of the pectoral muscle. Sometimes men have very hairy chest, so a lot lubricating cream is necessary to suck the cup efficiently.
Leave them on for 5-15 minutes as usual.
Usually the patient feels immediate relief after the session. For chronic conditions repeat the procedure every 3-4 days for at least 10-15 treatments. Acute cases can even be resolved even after one treatment.
Final Results
Generally speaking, cupping is a safe therapy, but still certain side effects are possible.
First of all, pain aggravation can happen. This will mostly happen due to over stimulation, which means that you probably applied to much suction on the cups. So be especially careful on your first session with a new patient, because he can be more sensitive than you assessed. Likewise, be more careful with more sensitive areas, like neck, upper trapezius, sides of the trunk or near inflamed joints. In all these cases work slowly, gradually and gently, or consider applying silicone cups.
The second common side effect is itching. It can appear during the procedure, immediately after, or a few hours later. To avoid this, I usually start the treatment by lubricating patient’s skin with good quality aloe cream, and finish by smearing another later of it by the end of the session.
The last unpleasant reaction is blisters. They appear when you leave the cups on patient’s body for too long time. How long is too long? It depends on your patient’s skin condition. In most cases younger patients have better skin elasticity and can endure cupping for a longer time (12-15 minutes approximately), while the skin condition of older patients is usually less elastic and accordingly can have blisters appear already after 5-7 minutes. So be more careful with elders and keep your eyes on the cups (that’s why it’s important to work with transparent cups). If it did happen, and blisters appeared – you can leave it and let them heal by themselves, but then the healing process can take long time (at least several weeks). However if you are a trained and licensed acupuncturist, you can speed up the healing process by pricking the blisters with a syringe needle and drain the fluid out. Then it will then take only a few days.
Curative effect and expectations
In most cases cupping provides patients immediate relief. It is so good that in acute cases even one treatment can enough.
However, with chronic conditions the effect is slower and sometimes more than 10 sessions are needed. Some patients you will not be able to cure with cupping, but still can significantly improve their condition with constant maintaining.
Treatment intervals were discussed in the protocols chapter, each protocol in detail, but as a general rule, 4-5 days rest between sessions is optimal.
Remember, cupping treatment is mostly effective for muscle tissue. For nerve damage, inflammations due to rheumatic issues, or joint degeneration – cupping therapy is less effective. However, it can still provide some degree of relief in these cases too. Some patients have nerve pain or joint diseases provoked by previous chronic muscle spasm, so in these cases cups will treat the origin of the problem, which is great!
You must take in account, that the cupped area will probably feel more sensitive for the first 2 days after the treatment, but this is ok – it’s a normal and good reaction, just explain this to your patients and you will avoid unpleasant calls from them.
The darker the bruises after treatment – the better results you can expect. On the other hand, if no color appears after cupping, there is a lower chance of patient’s improving and another sort of treatment may be needed.
Afterword
Thank you for taking my course on professional cupping therapy. I believe that good clinical results are achieved by intensive learning and by gaining experience with practice. So please go over this course again whenever you have time, and practice cupping in your clinic! The more you cup – the more confident you will be. The higher your confidence – the better results you will have. Believe me – it’s that simple!
I assure you, after a while you will fall in love with cupping! Your patients will fall in love with it and they will request cupping!
I assume that even after going over this course several times, you may still have questions. I encourage you to contact me by email with any question you have. This is my email address: d2dtherapies@gmail.com and please feel free to use it.
I hope you enjoyed the course as much as I. Good luck and have a great success in you clinic!
Tags:
fire cupping therapy
cupping therapy with fire
fire cupping therapy near me
fire cupping therapy benefits
fire cupping therapy cost
how to do fire cupping therapy at home
what is fire cupping therapy
benefits of fire cupping therapy
fire cupping therapy at home
how to do fire cupping therapy
chinese fire cupping therapy
cupping therapy
cupping for therapy
cupping therapy near me
cupping therapy benefits
cupping therapy course
does cupping therapy work
cupping therapy london
cupping therapy hijama
cupping therapy blood
what does cupping therapy do
cupping therapy blood
cupping therapy uk
fire cupping therapy benefits Archives - D2D THERAPIESCall Now Button